Sentiment Analysis with TFX Pipelines — Local Deploy
Build a local TFX pipeline, create a sentiment analysis model using the Transformer architecture and serve the model with TF Serving
1. Introduction
In this article, we will cover the process of building a pipeline to deploy a sentiment analysis model with TFX Pipelines.
This article is the first of two parts. In this part, we’ll cover how to run our pipeline locally. In the second part, CI/CD for TFX Pipelines with Vertex and AI Platform, we’ll cover how to make our model available on Google Cloud Platform (GCP) and how to develop our CI/CD pipeline.
By the end of this article, you will be able to:
- Create a sentiment analysis model
- Create a pipeline integrating all components
- Serve your model locally via a REST API
- Analyze your pipeline metadata
The code for the entire application is available in this GitHub repository.
2. TFX (TensorFlow Extended) + MLOps
To build our pipeline, we will use TFX.
According to the TFX User Guide¹, “TFX is a Google-production-scale machine learning (ML) platform based on TensorFlow. It provides a configuration framework and shared libraries to integrate common components needed to define, launch, and monitor your machine learning system.”
According to Di Fante⁵, there are three very important concepts in MLOps:
- Data Provenance: where your data comes from, how it came about and what methodologies and processes were submitted.
- Data Lineage: sequence of steps until reaching the end of the pipeline.
- Meta-data: data that describes data. They serve to explain the characteristics of the item we are observing.
These 3 are key parts in production models, as they help you track changes that occur in your model’s lifespan. Production models have several versions, files and people involved, so it’s important to work with frameworks that have mechanisms to easily reproduce an environment that our pipeline was exposed to, such as TFX.
3. Pipeline
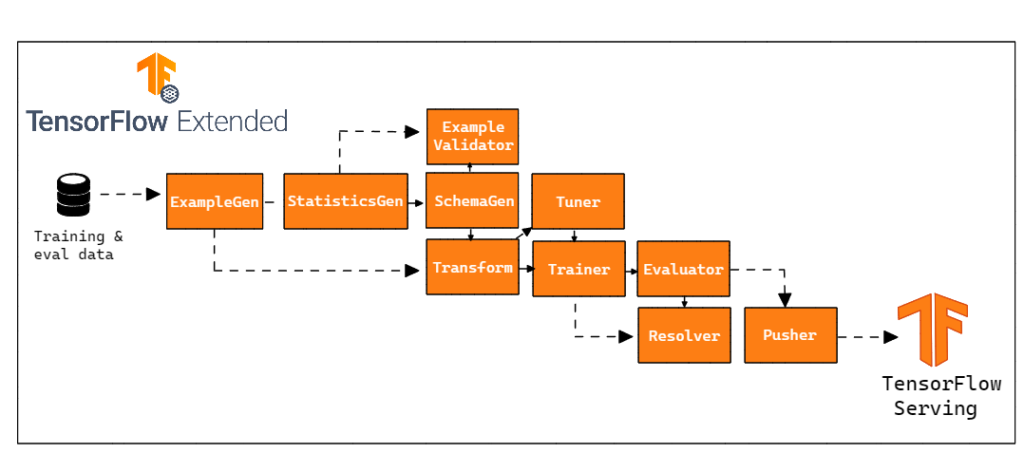
A TFX pipeline is a sequence of components that implements an ML pipeline specifically designed for scalable, high-performance machine learning tasks.

Each component is responsible for a task within the TFX Pipeline and, many times, one component depends on the outputs of the other. TFX has several tutorials explaining how to use the components.
3.1 Components
In our case, we chose not to use the InfraValidator component. However, we chose to add one more node to our pipeline, Resolver. Resolver is a special TFX node that handles resolving special artifacts, in our case it was used to specify the last base model within the Evaluator component.
Inside run_pipeline.py, we define the TFX pipeline. All components and parameters will be located in this file.
3.1.1 ExampleGen
It is the initial input component of a pipeline that processes and optionally splits the input dataset. Consumes files from external sources such as CSV, TFRecord, Avro, Parquet and BigQuery.
3.1.2 StatisticsGen
Computes dataset statistics.
3.1.3 SchemaGen
Examine statistics and create a data schema.
3.1.4 ExampleValidator
Looks for anomalies and missing values in the training and delivery of the data, such as detecting data deviations.
3.1.5 Transform
Performs feature engineering on the dataset. In this component we perform all the transformations/creations of variables of our model. An important point of this component is that it generates a graph that stores the global properties of the data, which will be used both in training and inference, offering reliability.
3.1.6 Tuner
Adjusts the model’s hyperparameters. The tuner can be run on all pipeline runs, or it can also be imported, if you want to perform hyperparameter tuning only from time to time.
3.1.7 Trainer
Train the model. It is in this component that we specify where and how it will be trained, in addition to defining its entire architecture.
3.1.8 Resolver
A special TFX node that handles resolution of special artifacts, in our case it was used to specify the last base model within the Evaluator component.
3.1.9 Evaluator
Performs in-depth analysis of training results and helps validate exported models, ensuring they are good enough to be sent to production. In this component it is possible to specify metric validation thresholds, preventing the model from going to production if it does not reach the limits.
3.1.10 Pusher
Deploys the model to a display infrastructure. This is where we specify where the model will be served.
So, the structure of our application is this:
│   run_local_pipe.ipynb
│
├───modules
│   │   label_encoder.pkl
│   │   model.py
│   │   preprocessing.py
│   │
│   ├───best_hyperparameters
│   │       best_hyperparameter.txt
│   │
│   └───data
│           data.csv
│
└───tfx-pipeline
    │   kubeflow_v2_runner.py
    │   local_runner.py
    │
    └───pipeline
        │   configs.py
        │   run_pipeline.py
In the tfx-pipeline directory we have the files referring to the orchestrators settings.
- local_runner.py — defines parameters and variables to run the pipeline locally
- kubeflow_v2_runner.py — defines parameters and variables to run the pipeline locally/cloud using kubeflow as an orchestrator
In tfx-pipeline/pipeline we have files referring to the pipeline settings
- configs.py — define global application settings, such as pipeline name and file path
- run_pipeline.py — definition of the TFX pipeline, definition of all components and parameters
In modules we have files referring to the construction of the model.
- label_encoder.pkl — LabelEncoder object from sci-kit learn to encode/decode the target variable
- model.py — construction of the classification model (trainer component)
- preprocessing.py — transformation and preprocessing of variables (transform component)
- best_hyperparameter.txt — file derived from the Tuner Component, containing the model’s hyperparameters
Finally, with run_local_pipe.ipynb we can create and run our pipe locally, in addition to analyzing the generated artifacts.
3.2 — Model Building
Our model is an adaptation of the Transformer² architecture. The great differentiator of this architecture is the introduction of the attention mechanism, which analyzes the input sequence and provides context about the importance of each part of the sequence. Thus, unlike Recurrent Neural Networks (RNN), this architecture allows data parallelization, reducing training time.
The model was built with TensorFlow and the objective is to classify a sentence as positive, negative or neutral, so it is a classification model.
During pipeline construction, there are two very important components: Transform and Trainer. These components, in our architecture, are represented by the files preprocessing.py and model.py, respectively. Let’s address each of them to understand the processing of variables and the construction of our model.
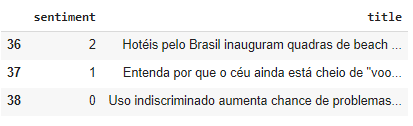
3.2.1 Data
Our training data are titles of news in Portuguese (PT-BR) and classified between: positive, negative or neutral, already in numerical format through a LabelEncoder.
3.2.2 Preprocessing
We chose to perform few transformations on the input data. The function below illustrates the transformations on the input data.
The main focus is to remove accents, special characters, numbers and stopwords from input strings.
3.2.3 Model
We won’t go into the details of all the data loading/training functions as they are already extensively demonstrated in the TFX tutorials.
I would just like to discuss 2 important points in defining the model: the architecture and the signatures.
Architecture
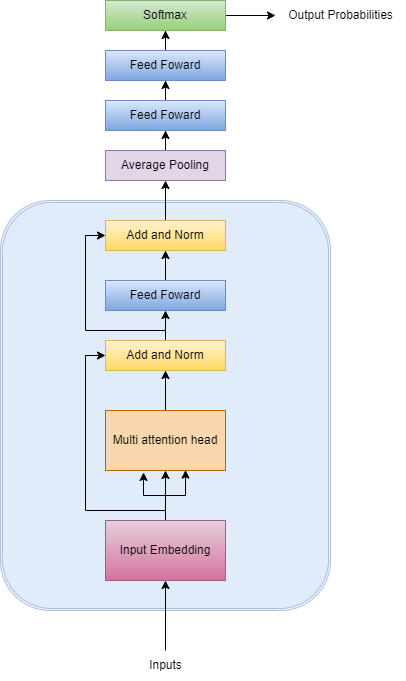
As our model is an adaptation of the original architecture, we chose to make it simpler.
Our model takes the inputs and transforms them into embeddings, which are vector representations of the sentence. Afterwards, the embeddings are passed to the multi-head attention layer, which will create vectors for each word in the sentence, representing the importance and context relationship between words. The normalization layer is used to help stabilize the gradient descent and help the model converge.
Finally, we pass the outputs to a Feedforward Network (FFN), a simple layer that helps transform attention vectors into a digestible form between blocks. We added a few more similar layers until we defined the output layer, activated by the softmax function, which outputs a vector of probabilities referring to the 3 classes of the target variable.
In this way, our model is constructed as follows:
Signatures
When making machine learning models available, we need to think about how our model will receive data for prediction. TensorFlow models have the SavedModel format, which allow us to create several signatures to define how our model will receive data and make predictions available.
Therefore, we created a signature that accepts input in string form instead of the original TFX example, which expects data in tf.train.Example format. The output of our signature returns the probabilities of each class, the class with the highest probability, and the value of the highest predicted probability.
Then, we define the signatures of our model. At the time of prediction, we can choose which signature we want and so we have several data formats accepted by our model.
4. Local Deploy
Finally, we can run our pipeline. The run_local_pipe.ipynb notebook was made for us to create, run and analyze our pipeline.
We use TFX-cli to create the pipeline, passing as an argument the local engine and the path to the desired file, in this one, local_runner.py.
And finally, we can run it.
Now, all our components will run and our model is available for predictions.
5. Serving the model with TensorFlow Serving
There are several ways to serve a model for predictions, and one of them is TensorFlow Serving.
TensorFlow Serving is a flexible, high-performance serving system for machine learning models, designed for production environments. TensorFlow Serving makes it easy to deploy new algorithms and experiments, while keeping the same server architecture and APIs. TensorFlow Serving provides out-of-the-box integration with TensorFlow models, but can be easily extended to serve other types of models and data.⁴
First, we define where our model is located and download the TF-Serving package.
And then we start TensorFlow Serving. Here we define some important parameters:
– rest_api_port: The port you will use for REST requests.
– model_name: You will use this in the URL of REST requests. It could be anything.
– model_base_path: This is the path to the directory where you saved your model.
5.1 Making REST requests
We are now ready to make requests. We load our encoder to transform our target variable according to training, we define the url, our signature and data we want to predict. Afterwards, we make a POST prediction request to our server, which returns the probabilities of each instance participating in the target classes, the predicted class, and the value of the highest predicted probability.
6. Evaluate pipeline artifacts
The outputs of the components of a TFX pipeline are called artifacts. These artifacts are registered in the metadata repository, which we define in the settings. Some of these artifacts can be visualized graphically, and they provide valuable insights into our data.
We can access the artifacts produced by our pipeline through our metadata repository. We can also filter specific types of artefacts to visualize and define the output paths of these artefacts.
And from these artifacts, we can visualize them graphically. Let’s view the results of StatisticsGen, for example.
We can then view the training and validation data statistics side by side.

7. Conclusion
Developing a local pipeline is the first step towards integrating our application and being able to standardize the training and inference of our model. To evolve our pipeline, in part 2 of this article, we will develop and deploy it in a Cloud environment, in addition to applying CI/CD practices, making it scalable and easier to maintain.
8. References
[1] The TFX User Guide (01 September 2021), TensorFlow.
[2] Vaswani, A.; Shazeer, N., Parmar, N.; Uszkoreit, J.; Jones, L.; Gomez, A. N.; Kaiser, L.; Polosukhin, I. Attention is all you need. (12 June 2017), arXiv preprint arXiv:1706.03762.
[3] Nandan, A. Text classification with Transformer (10 May 2020), Keras.
[4] TF Serving (28 January 2021), TensorFlow.
[5] Di Fante, A. L. How I deployed my first machine learning model (15 December 2021), arturlunardi.
[6] Amoateng, D. Text classification pipeline tfx local (01 January 2022), GitHub.